 Building Cahute for Microsoft Windows
Warning
In order to install Cahute on Windows, it is recommended to use one of the methods in Installing Cahute on Microsoft Windows. However, if you wish to build Cahute manually, this guide is for you.
The following building methods are available.
Note
Since you will not be using a packaged version of Cahute, the project won’t be automatically updated when updating the rest of the system, which means you will need to do it manually, especially if a security update is made.
You can subscribe to releases by creating a Gitlab.com account, and following the steps in Get notified when a release is created. You can check your notification settings at any time in Notifications.
Building Cahute for Microsoft Windows Vista and above, using Visual Studio
Warning
Both Windows XP and above as a target and this build method are not officially supported yet.
See Microsoft Windows for more information.
It is possible to build Cahute for Windows Vista and above, using Microsoft’s Visual Studio.
Setting up the project and configuration
If you have not set up the project, you must follow the instructions in Cloning the Cahute repository in Visual Studio.
Once this is done, you need to go to the project’s CMake configurations, by going in “Project”, then “CMake settings for cahute”:
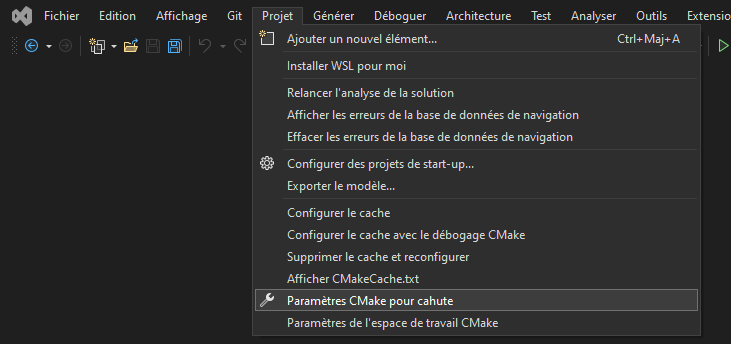
Visual Studio, with the “CMake settings” menu selected.
Look for “x64-Windows” in the configuration list. If you do not have such a configuration yet, click on the “+” icon:
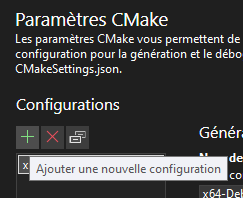
Configuration list, with the “+” button highlighted.
This will open a list of configurations to add. Look for “x64-Release”, then click on “Select” at the bottom of the window:
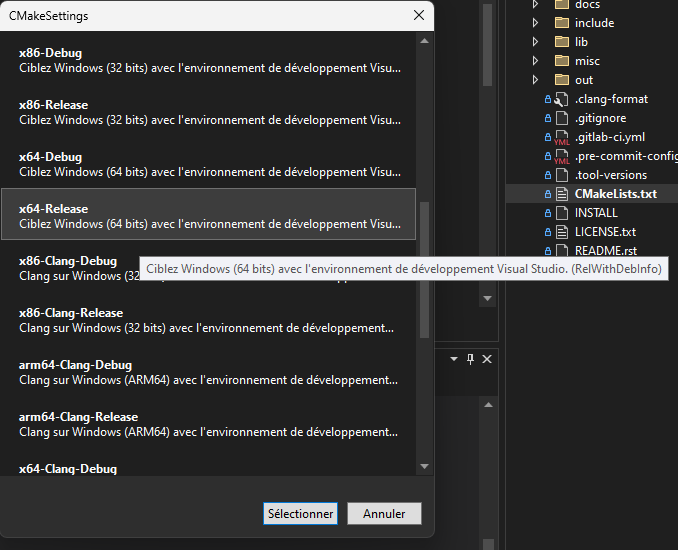
Sample configuration list, with the “x64-Release” configuration highlighted.
Once this is selected, the new configuration should appear in your list. Select it, then click on the configuration type to update its value to “Release”:
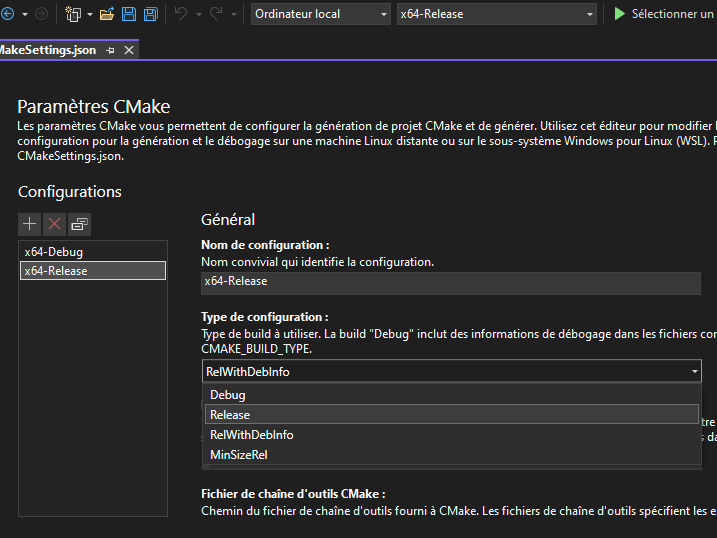
Configuration details for “x64-Release”, with the configuration type dropdown selected and the “Release” option highlighted.
Once this is selected, you can save by clicking on the floppy on the top left of the IDE, or using the Ctrl+S shortcut.
Warning
You may have the following error when configuring the project using CMake:
Could NOT find PkgConfig (missing: PKG_CONFIG_EXECUTABLE)
This is likely, in fact, an error with the vcpkg integration with Visual Studio, as by default, packages are not installed and accessed. In order to do this, as described in Installing and using packages (vcpkg), you can either:
Integrate
vcpkgfor all projects with Visual Studio, by runningvcpkg integrate install;Only enable
vcpkgby setting the CMake toolchain option to your vcpkg install’svcpkg.cmake:
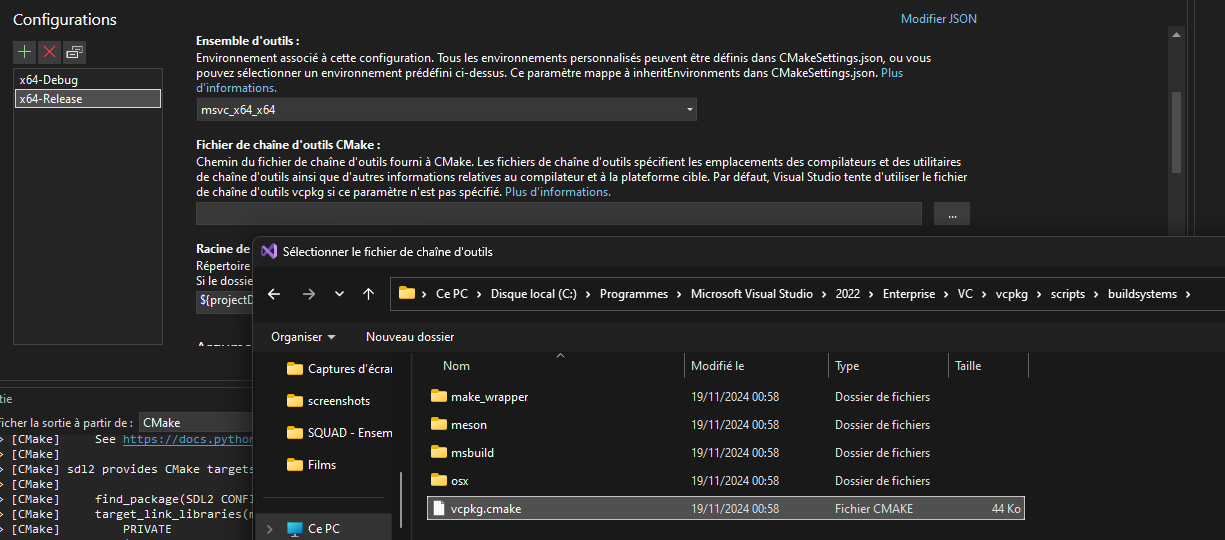
Configuration details for “x64-Release”, with selection of the CMake
toolchain to use vcpkg’s vcpkg.cmake.
Building the project
From here, you can select the target you want to build next to the green arrow
on the top, and the architecture you’re targetting. By leaving the default
(x64-Debug) and clicking on p7.exe, we obtain the following:
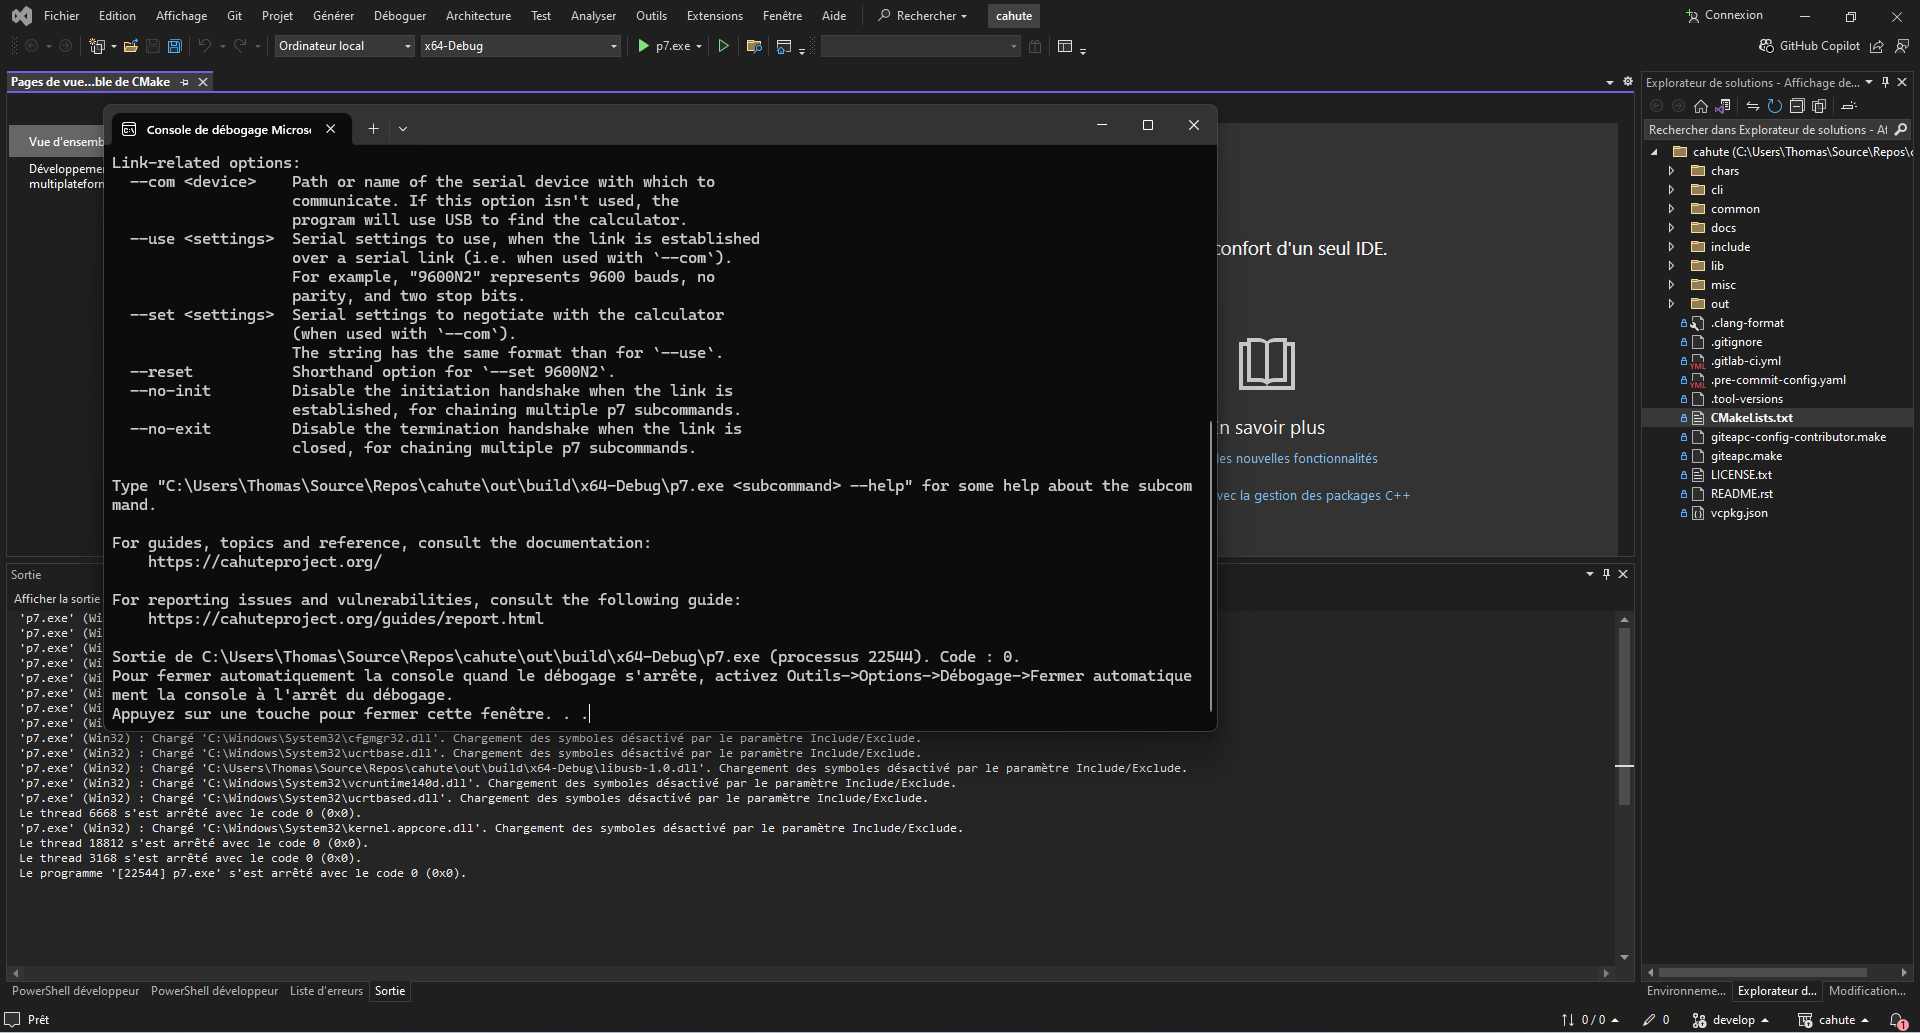
Visual Studio, after building and running p7.
Warning
It is possible the build may be running into an error, in which case you should select “No” for debugging, then go into the output to see the error:
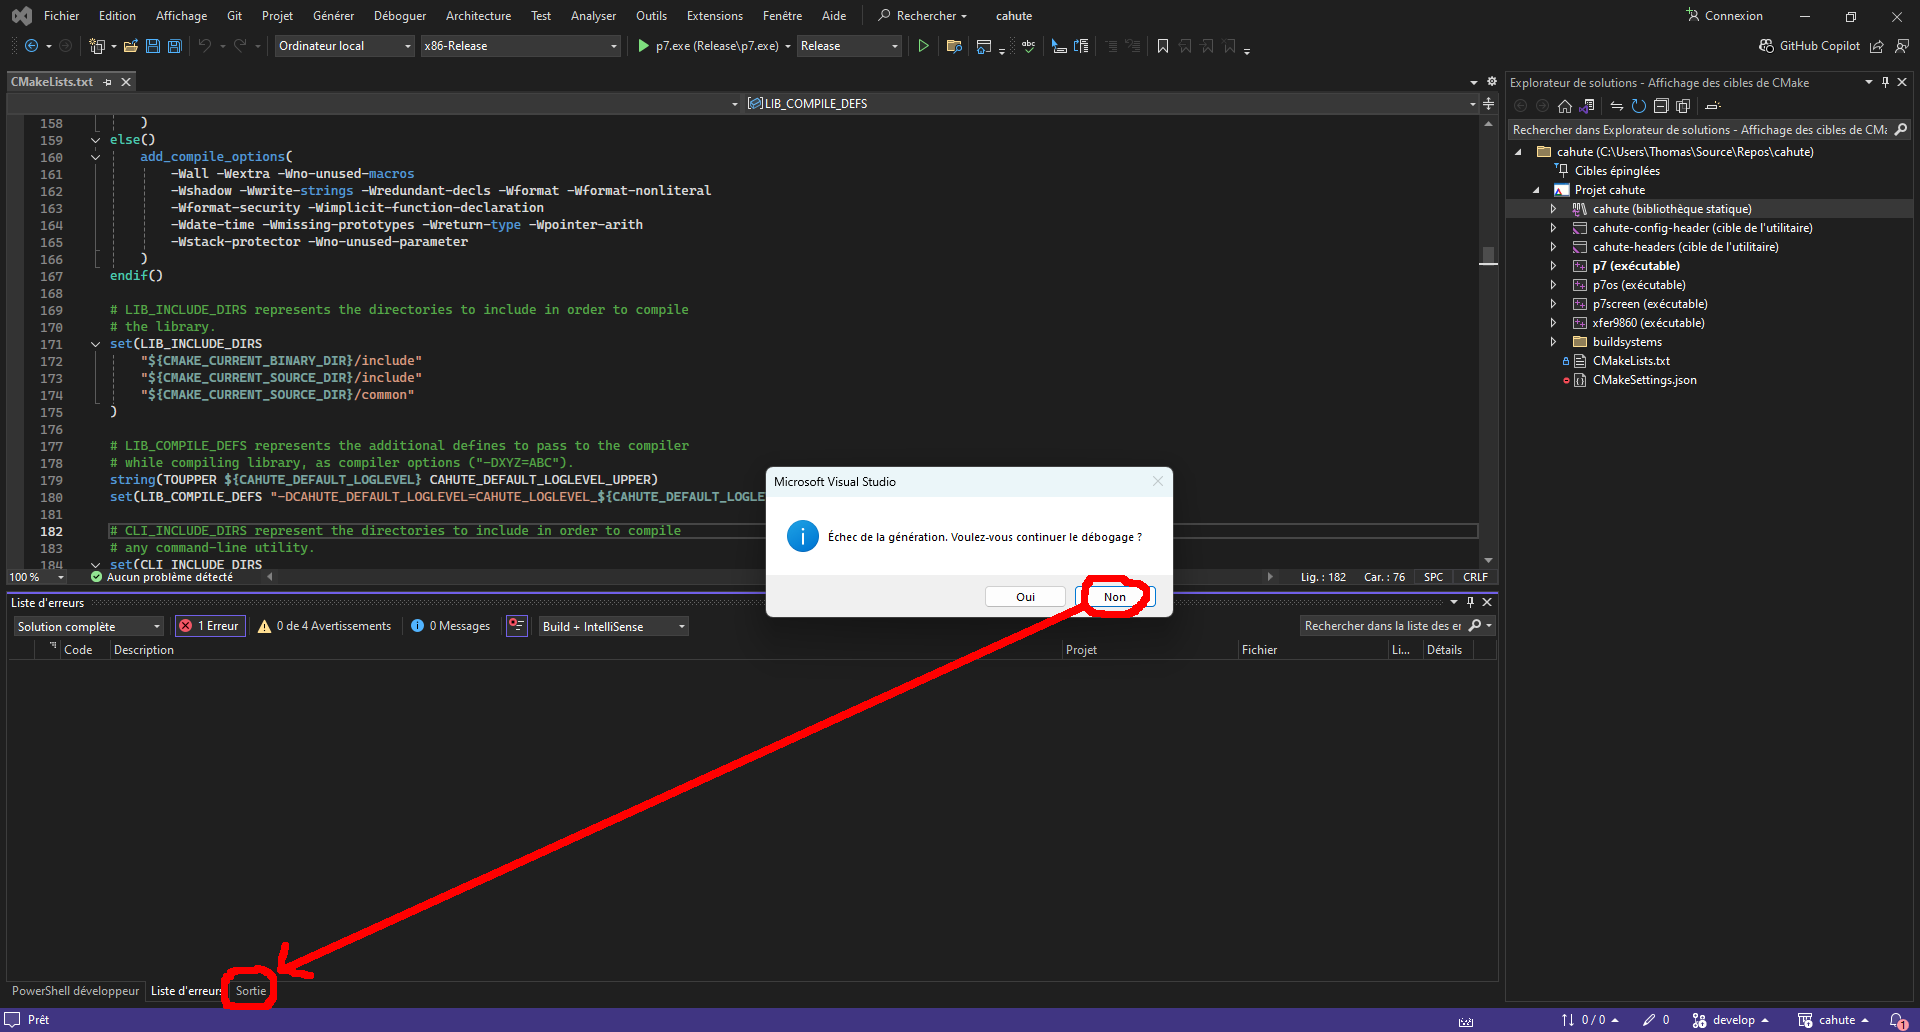
The build has failed, what to do now?
If your error regards the Python toml module not being installed,
it will look like this:
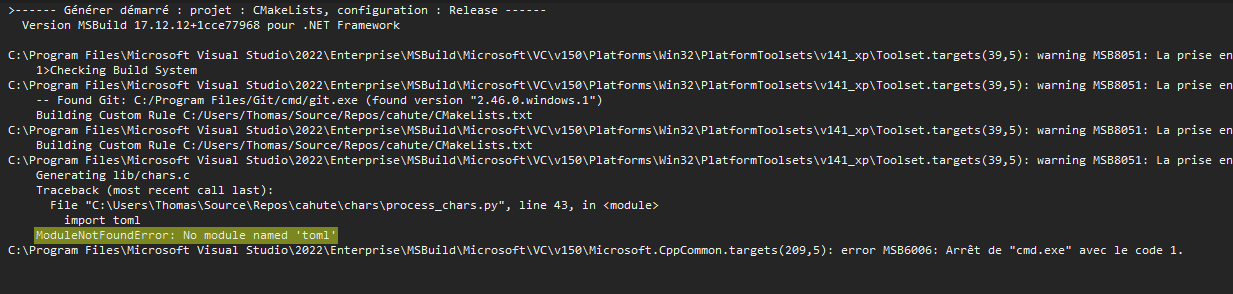
An error output that indicates the toml Python module is missing!
In which case you will need to go into the “PowerShell” tab, and type the following:
py -m pip install toml
The output will resemble the following:
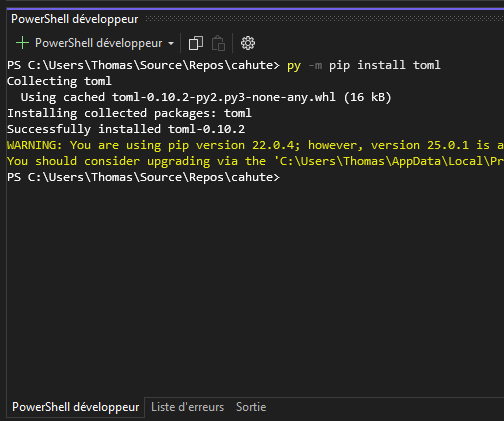
A successful Python module install from the PowerShell tab in Visual Studio.
Since Cahute defines mostly command-line utilities, it may be more interesting to have access to a command-line interface. In order to this, in the context menu, select “Tools”, “Command line”, then “Developer Powershell”:
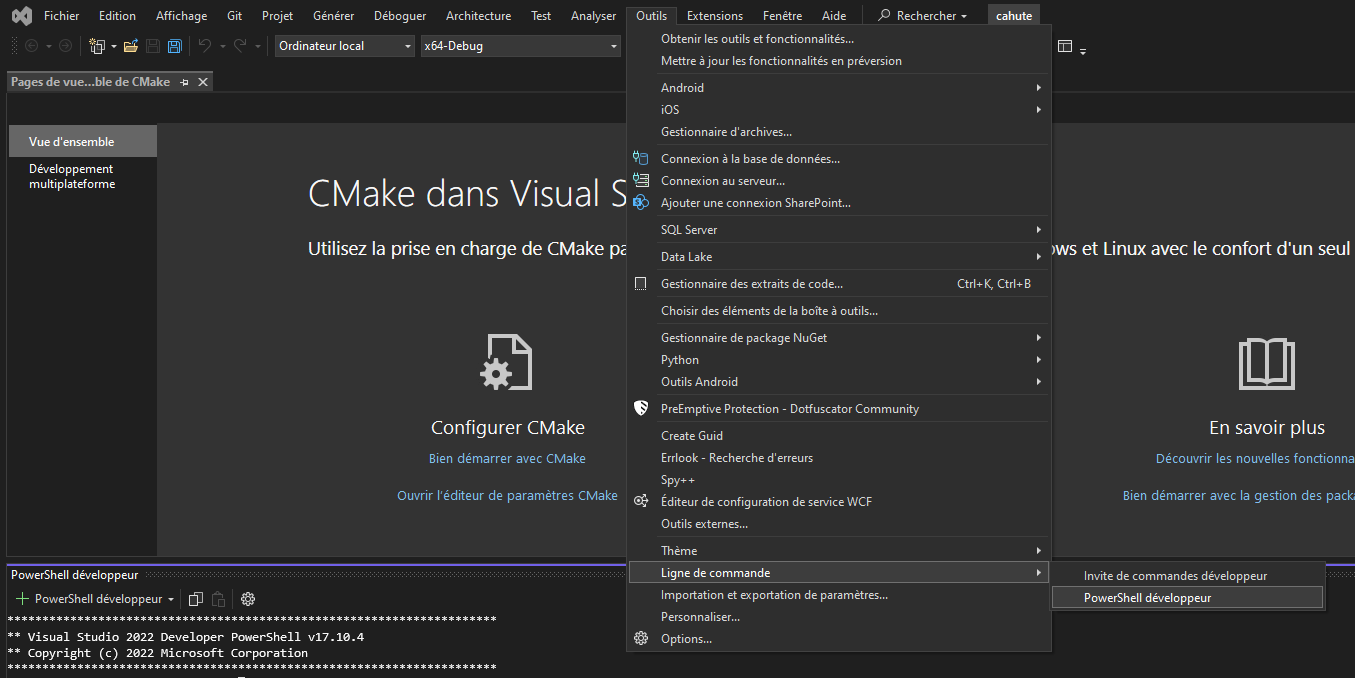
Visual Studio, with contextual menus opened up to “Developer Powershell”.
A console should open at the bottom of the IDE. In this console, use cd
to go to the build directory (by default, .\out\build\<target>), and
run the command-line utilities from here with the options you want to test.
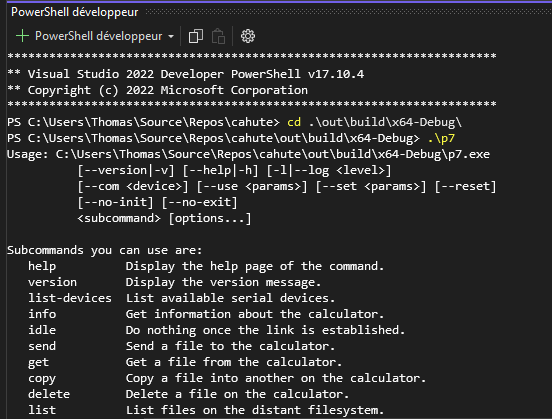
A PowerShell developer console opened in Visual Studio, running p7 from the build directory directly.
Building Cahute for Microsoft Windows XP, using Visual Studio
Warning
Both Windows XP and above as a target and this build method are not officially supported yet.
See Microsoft Windows for more information.
It is possible to build Cahute for Windows XP, using Microsoft’s Visual Studio.
Installing the MSVC v141_xp toolset for Visual Studio
By default, Visual Studio Installer selects MSVC v143 or later, which does not support Windows XP. In order to support Windows XP, you will need to open Visual Studio Installer, modify your existing installation, go to “Individual components”, then select everything pertaining to MSVC v141:
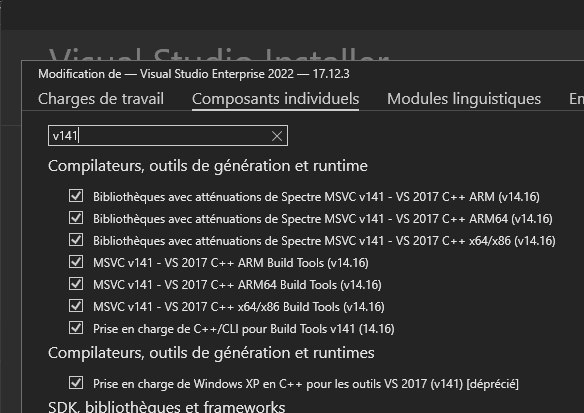
Visual Studio Installer’s “Individual components” tab, with MSVC v141 elements selected.
You can then select “Modify” at the bottom right of the window in order to download and configure MSVC v141.
Setting up the project and configuration
If you have not set up the project, you must follow the instructions in Cloning the Cahute repository in Visual Studio.
Once this is done, you need to go to the project’s CMake configurations, by going in “Project”, then “CMake settings for cahute”:
Visual Studio, with the “CMake settings” menu selected.
Look for “x64-Windows” in the configuration list. If you do not have such a configuration yet, click on the “+” icon:
Configuration list, with the “+” button highlighted.
This will open a list of configurations to add. Look for “x64-Release”, then click on “Select” at the bottom of the window:
Sample configuration list, with the “x64-Release” configuration highlighted.
Once this is selected, the new configuration should appear in your list. Select it, then click on the configuration type to update its value to “Release”:
Configuration details for “x64-Release”, with the configuration type dropdown selected and the “Release” option highlighted.
Scroll down until you see “CMake command arguments”, and add -T v141_xp
in the matching dialog box:
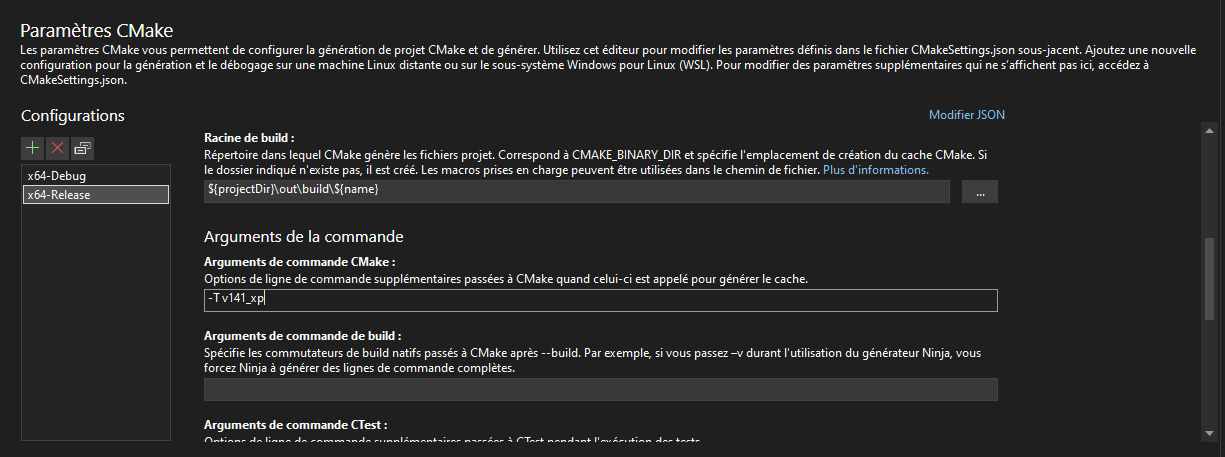
Configuration details for “x64-Release”, with the CMake command-line
parameters being set to -T v141_xp.
Scroll down more until you reach the “Display advanced parameters”, on which you must click:
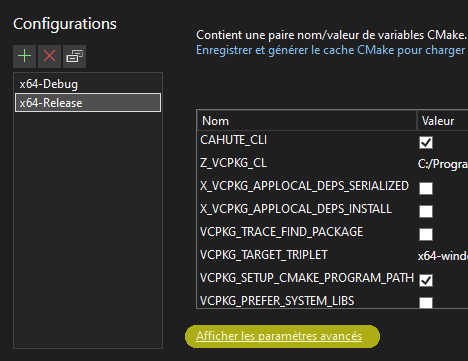
Configuration details for “x64-Release”, with the “Display advanced parameters” option highlighted.
You can now scroll down more to “CMake generator”, which you must set to
Visual Studio 17 2022:
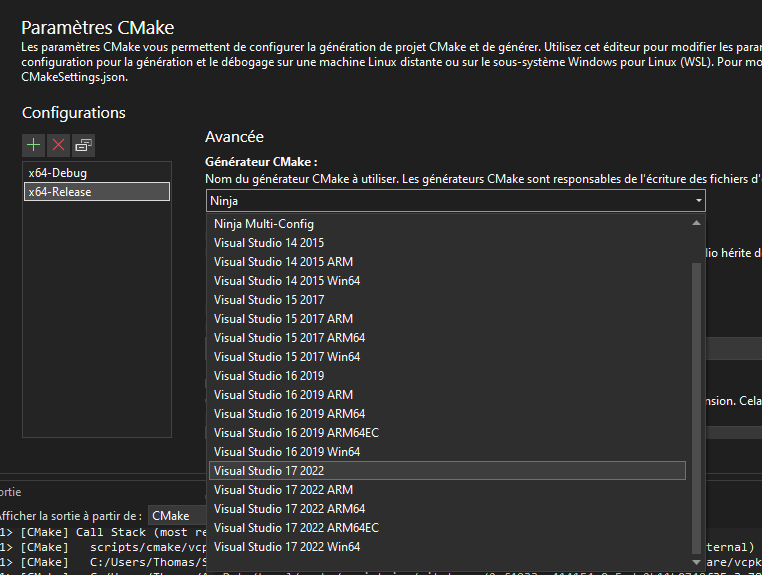
Configuration details for “x64-Release”, with the CMake generator
being set to Visual Studio 17 2022.
Once this is selected, you can save by clicking on the floppy on the top left of the IDE, or using the Ctrl+S shortcut.
Building the project
From here, you can select the target you want to build next to the green arrow
on the top, and the architecture you’re targetting. By leaving the default
(x64-Debug) and clicking on p7.exe, we obtain the following:
Visual Studio, after building and running p7.
Warning
It is possible the build may be running into an error, in which case you should select “No” for debugging, then go into the output to see the error:
The build has failed, what to do now?
If your error regards the Python toml module not being installed,
it will look like this:
An error output that indicates the toml Python module is missing!
In which case you will need to go into the “PowerShell” tab, and type the following:
py -m pip install toml
The output will resemble the following:
A successful Python module install from the PowerShell tab in Visual Studio.
Since Cahute defines mostly command-line utilities, it may be more interesting to have access to a command-line interface. In order to this, in the context menu, select “Tools”, “Command line”, then “Developer Powershell”:
Visual Studio, with contextual menus opened up to “Developer Powershell”.
A console should open at the bottom of the IDE. In this console, use cd
to go to the build directory (by default, .\out\build\<target>), and
run the command-line utilities from here with the options you want to test.
A PowerShell developer console opened in Visual Studio, running p7 from the build directory directly.
Note
If you are running the executables on another machine, you will need to install the Visual C++ Redistribuable Packages on said machine.
If you’ve selected Visual Studio 17 2022, you can download and install
Visual C++ Redistribuable for Visual Studio 2015 on the target machine
before running the executable.
Building Cahute for Microsoft Windows 2000 and above, using Visual Studio and MinGW-w64
Warning
Both Windows XP and above as a target and this build method are not officially supported yet.
See Microsoft Windows for more information.
It is possible to build Cahute for Windows XP, using Microsoft’s Visual Studio and MinGW-w64.
Installing the required components
You need to install MinGW-w64 first. Pre-built binaries are available;
for this, go to MinGW-w64 Downloads to the WinLibs.com section,
click on the link present in the section, then go to the Download,
Release versions, MSVCRT runtime, and select the latest archive for
Win64:
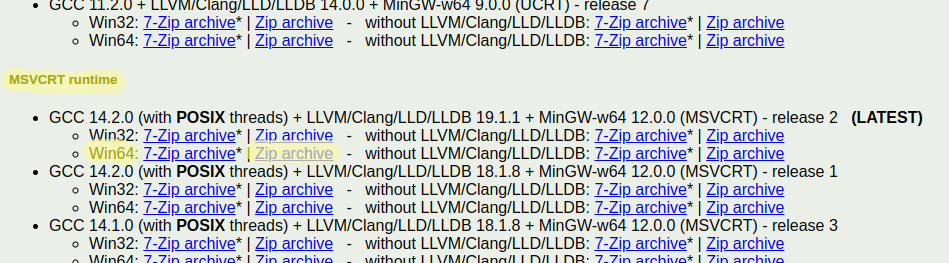
A preview of the downloads section, with the link at roughly the correct position selected.
Warning
You should only trust WinLibs.com as long as they are referenced on
the MinGW-w64 website, as this website may be compromised at some point
(possibly as you read this!).
Once you’ve downloaded the archive, you can open it, and move the mingw64
directory it contains to any directory you like; for this guide, we will move
the directory to C:\.
Setting up the project and configuration
If you have not set up the project, you must follow the instructions in Cloning the Cahute repository in Visual Studio.
Once this is done, you need to go to the project’s CMake configurations, by going in “Project”, then “CMake settings for cahute”:
Visual Studio, with the “CMake settings” menu selected.
Look for “Mingw64-Release” in the configuration list. If you do not have such a configuration yet, click on the “+” icon:
Configuration list, with the “+” button highlighted.
This will open a list of configurations to add. Look for “Mingw64-Release”, then click on “Select” at the bottom of the window:
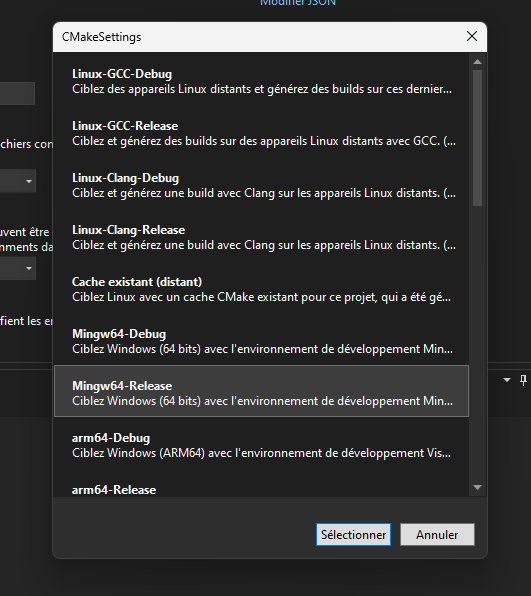
Sample configuration list, with the “x64-Release” configuration highlighted.
Once this is selected, the new configuration should appear in your list. Select it, then click on the configuration type to update its value to “Release”:
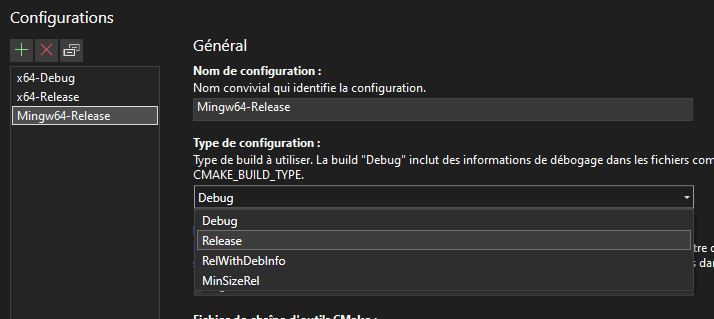
Configuration details for “Mingw64-Release”, with the configuration type dropdown selected and the “Release” option highlighted.
Now, click on “Modify JSON” on the top right corner of the CMake parameters.
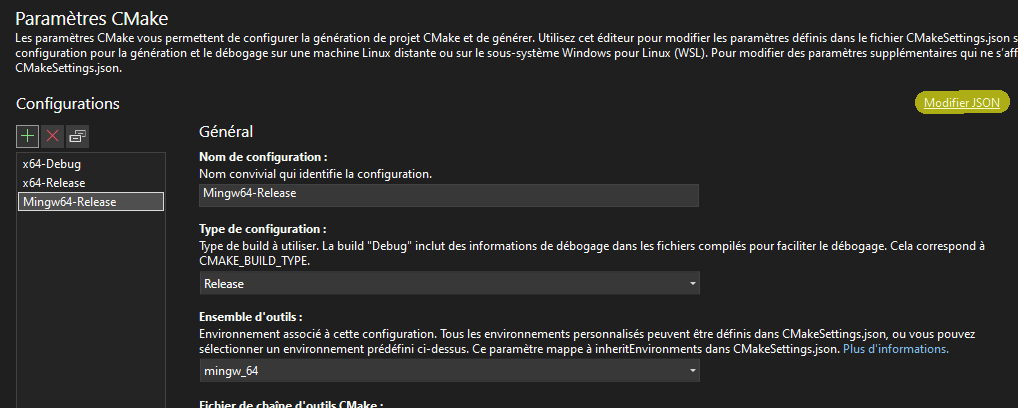
Configuration details for “Mingw64-Release”, with the “Modify JSON” option highlighted.
Look for the configuration with the “Mingw64-Release” name, then edit the
value for MINGW64_ROOT to the path where you put MinGW-w64, in this
example C:/mingw64.
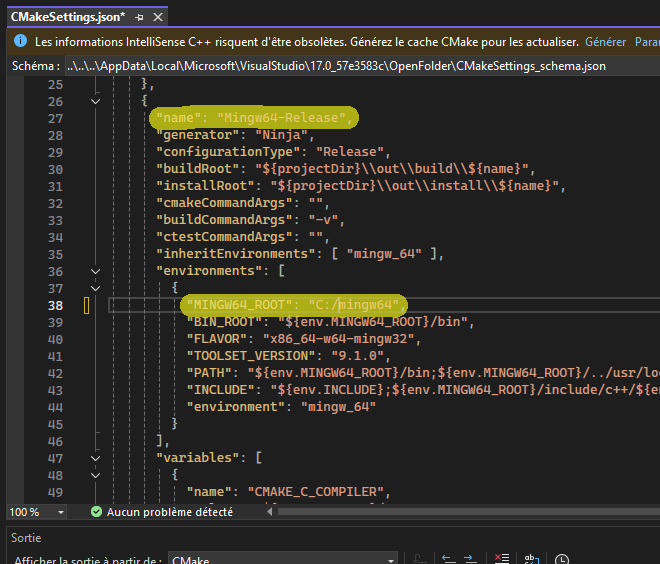
JSON configuration details for “Mingw64-Release”, with MINGW64_ROOT
highlighted and set to the value C:/mingw64.
Once this is done, you can save by clicking on the floppy on the top left of the IDE, or using the Ctrl+S shortcut.
Building the project
From here, you can select the configuration you want on the left of the green
arrow, then pick the target you want to build on the right of the green arrow
on the top. By selecting Mingw64-Release and clicking on p7.exe,
we obtain the following:
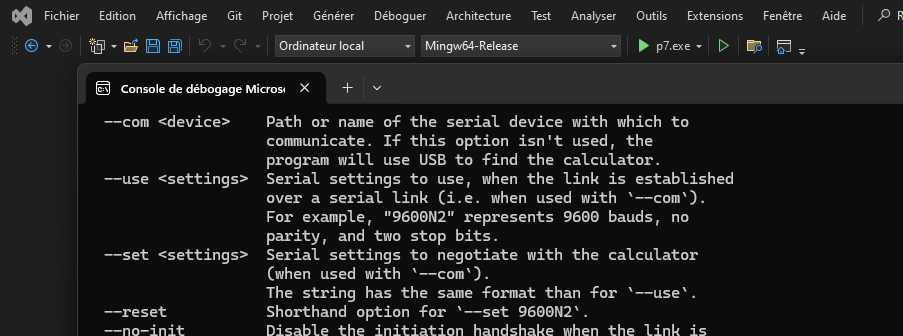
Visual Studio, after building and running p7 using MinGW-w64.
Warning
It is possible the build may be running into an error, in which case you should select “No” for debugging, then go into the output to see the error:
The build has failed, what to do now?
If your error regards the Python toml module not being installed,
it will look like this:
An error output that indicates the toml Python module is missing!
In which case you will need to go into the “PowerShell” tab, and type the following:
py -m pip install toml
The output will resemble the following:
A successful Python module install from the PowerShell tab in Visual Studio.
Since Cahute defines mostly command-line utilities, it may be more interesting to have access to a command-line interface. In order to this, in the context menu, select “Tools”, “Command line”, then “Developer Powershell”:
Visual Studio, with contextual menus opened up to “Developer Powershell”.
A console should open at the bottom of the IDE. In this console, use cd
to go to the build directory (by default, .\out\build\<target>), and
run the command-line utilities from here with the options you want to test.
A PowerShell developer console opened in Visual Studio, running p7 from the build directory directly.
Building Cahute for Microsoft Windows 2000 and above, using  MinGW-w64 on Archlinux
Warning
Both Windows XP and above as a target and this build method are not officially supported yet.
See Microsoft Windows for more information.
Building Cahute for Windows XP and above from Archlinux using MinGW-w64 is possible, as described in Cross Compiling With CMake.
Downloading the Cahute source
In order to get the current released version of the Cahute source, you have the following options:
You can download the latest source package:
curl -o cahute-0.6.tar.gz https://ftp.cahuteproject.org/releases/cahute-0.6.tar.gz
tar xvf cahute-0.6.tar.gz
You can clone the repository and checkout the tag corresponding to the release:
git clone https://gitlab.com/cahute/cahute.git cahute-0.6
(cd cahute-0.6 && git checkout -f 0.6)
The project is present in the “cahute-0.6” directory.
Warning
If you are building the project in the context of the Creating a merge request guide, these commands need to be replaced by the following:
git clone <your-repo-url>
Where the repository’s URL can be obtained through the Code button
on the Gitlab.com interface:
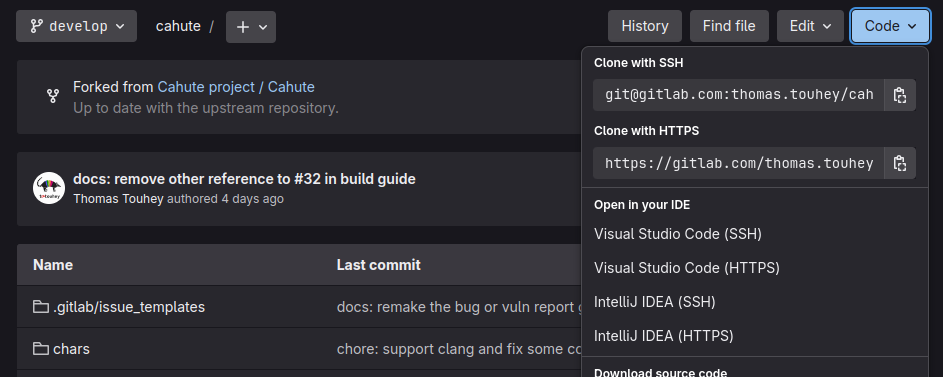
Gitlab.com’s repository interface with “Code” selected, presenting the options to clone the repository.
Installing the dependencies
You need to first install the required dependencies from the AUR, by using your favourite AUR helper, e.g. with paru:
paru -S cmake python python-toml mingw-w64 \
    mingw-w64-cmake mingw-w64-sdl2
Building the project
In the parent directory to the source, you can now create the build
directory aside it, by running either one of the following command depending
on the architecture you’re targeting:
i686-w64-mingw32-cmake -B build -S cahute-0.6
x86_64-w64-mingw32-cmake -B build -S cahute-0.6
You can now build the project using the following command:
cmake --build build
Before testing with either Wine or a Windows host, it is recommended to copy the required shared libraries to the build directory, by running either one of the following command depending on the architecture you’re targetting:
cp /usr/i686-w64-mingw32/bin/{libssp-0,SDL2}.dll .
cp /usr/x86_64-w64-mingw32/bin/{libssp-0,SDL2}.dll .
Note
For reference, this build method is used in the
MinGW build image for Cahute, which is exploited in the project’s
continuous integration pipelines as described in .gitlab-ci.yml.
Building Cahute for Microsoft Windows 2000 and above, using  Open Watcom on Archlinux
Warning
Both Windows XP and above as a target and this build method are not officially supported yet.
See Microsoft Windows for more information.
Building Cahute for 32-bit Windows and above from Archlinux using OpenWatcom is possible.
Downloading the Cahute source
In order to get the current released version of the Cahute source, you have the following options:
You can download the latest source package:
curl -o cahute-0.6.tar.gz https://ftp.cahuteproject.org/releases/cahute-0.6.tar.gz
tar xvf cahute-0.6.tar.gz
You can clone the repository and checkout the tag corresponding to the release:
git clone https://gitlab.com/cahute/cahute.git cahute-0.6
(cd cahute-0.6 && git checkout -f 0.6)
The project is present in the “cahute-0.6” directory.
Warning
If you are building the project in the context of the Creating a merge request guide, these commands need to be replaced by the following:
git clone <your-repo-url>
Where the repository’s URL can be obtained through the Code button
on the Gitlab.com interface:
Gitlab.com’s repository interface with “Code” selected, presenting the options to clone the repository.
Installing the dependencies
You need to first install the required dependencies from the AUR, by using your favourite AUR helper, e.g. with paru:
paru -S cmake python python-toml openwatcom-v2
You must then define the WATCOM environment variable, by executing, or
adding the following lines to your rc file (e.g. ~/.bashrc or ~/.zshrc)
then either resourcing it or starting up a new shell:
export WATCOM=/opt/watcom
export PATH="$WATCOM/binl:$PATH"
Building the project
In the parent directory to the source, you can now create the build
directory aside it, by running the following command:
cmake -S cahute-0.6 -B build -G "Watcom WMake" \
    -DCMAKE_SYSTEM_NAME=Windows -DCMAKE_SYSTEM_PROCESSOR=x86 \
    -DCAHUTE_SDL=OFF
You can now build the project using the following command:
cmake --build build
Building Microsoft Cahute for Windows 1.x and above, using Open Watcom on Archlinux
Warning
Both Win16 and this build method are not officially supported yet.
See Microsoft Windows for more information.
Building Cahute for 16-bit Windows and above from Archlinux using OpenWatcom is possible.
Downloading the Cahute source
In order to get the current released version of the Cahute source, you have the following options:
You can download the latest source package:
curl -o cahute-0.6.tar.gz https://ftp.cahuteproject.org/releases/cahute-0.6.tar.gz
tar xvf cahute-0.6.tar.gz
You can clone the repository and checkout the tag corresponding to the release:
git clone https://gitlab.com/cahute/cahute.git cahute-0.6
(cd cahute-0.6 && git checkout -f 0.6)
The project is present in the “cahute-0.6” directory.
Warning
If you are building the project in the context of the Creating a merge request guide, these commands need to be replaced by the following:
git clone <your-repo-url>
Where the repository’s URL can be obtained through the Code button
on the Gitlab.com interface:
Gitlab.com’s repository interface with “Code” selected, presenting the options to clone the repository.
Installing the dependencies
You need to first install the required dependencies from the AUR, by using your favourite AUR helper, e.g. with paru:
paru -S cmake python python-toml openwatcom-v2
You must then define the WATCOM environment variable, by executing, or
adding the following lines to your rc file (e.g. ~/.bashrc or ~/.zshrc)
then either resourcing it or starting up a new shell:
export WATCOM=/opt/watcom
export PATH="$WATCOM/binl:$PATH"
Building the project
In the parent directory to the source, you can now create the build
directory aside it, by running the following command:
cmake -S cahute-0.6 -B build -G "Watcom WMake" \
    -DCMAKE_SYSTEM_NAME=Windows3x -DCMAKE_SYSTEM_PROCESSOR=x86
You can now build the project using the following command:
cmake --build build